Introduction
Chaos Engineering is the discipline of experimenting on a distributed system in order to build confidence in the system’s capability to withstand turbulent conditions in production.
Who is ready to try? ![]()
The focus is exposing your staging environment to production-like conditions while running insightful Chaos Experiments.
When it comes to Chaos Engineering … you want to run your experiments as close to the production environment as possible. The ideal implementation runs all experiments directly in the production environment.
Since systems behave differently depending on environment and traffic patterns, the best way to ensure their resilience is to test them under these conditions. However, starting to break things in production without properly estimating the impact is not good…

Motivation
First chaos experiment encountered a few problems:
- Platform-specific: Most of the chaos tools are very platform-specific. For example — the original Chaos Monkey ran only on AWS Auto Scaling groups and required knowledge about AWS IAM. The latest version hasno streamlined process for deploying, and requires working with Spinnaker.
- Running in production: The principles of chaos engineering state that you should run your experiments in production, but I didn’t feel confident enough to start breaking things in production right away.
- Understanding the impact: Building this confidence by running experiments on test environments is tricky. Most of the tools are geared towards running continuously in production under real user traffic patterns. They provide no way for on-demand feedback about their effect on your test environment. You can see chaos events being logged to the console, but can’t understand their impact and “blast radius.”
To address these problems here is a step by step guide that:
- Doesnotrequire any specific infrastructure platform knowledge and can be applied to any environment running a Kubernetes cluster.
- Doesnothave to run in a production environment.
- Simulates real-world conditions of a production environment, and demonstrates the impact of chaotic events.
What We’ll Accomplish
- Set up a Kubernetes cluster and deploy our demo app to it.
- Simulate real user traffic and define our app’s ‘steady state’.
- Inject failure and run our first chaos experiment.
Prerequisites
- A working Internet connection.
- Basic understanding of Kubernetes’ main concepts is recommended, but not required.
Setup Staging Cluster
We will start by creating a Kubernetes cluster for our staging environment. To make this guide accessible through any device (Mac, Windows, tablets etc.) I have chosen to demonstrate it using Google Kubernetes Engine and Google Cloud Console. However, you can create your cluster on any platform — just skip ahead to Deploy Demo App.
Skipping…
Deploy Demo App
Now that we have our Kubernetes cluster up and running, and our terminal is ready, let’s deploy ourdemo appto the cluster. The app is a very simpleipinfo.ioclone written in node.js (30 lines of code). It detects the visiting-user’s IP and identifies its location using a library calledGeoIP-lite.
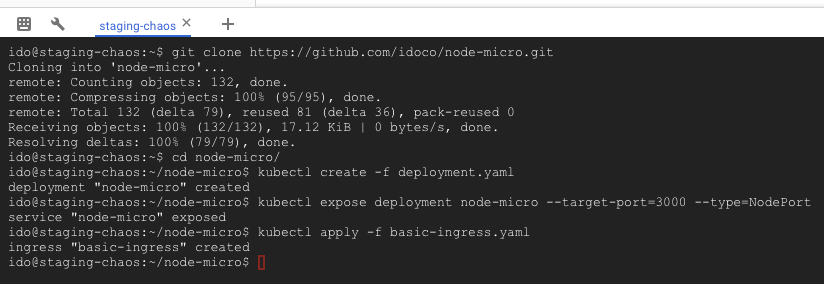
We start by cloning a git repository which contains all the configuration files we need for our app and chaos experiment. Run the following command in the shell:
git clone https://github.com/idoco/node-micro.git
Now deploy the app:
cd node-micro
kubectl create -f deployment.yaml
Expose the deployment internally as a service:
kubectl expose deployment node-micro --target-port=3000 --type=NodePort
Expose the service to the internet by creating an Ingress (Kubernetes term for HTTP load balancer):
kubectl apply -f basic-ingress.yaml
If you’re using GCP, go make yourself another cup of coffee — it can take up to 10 minutes for the LB to be ready.
When you’re finally sick of waiting, run this to get your deployment’s external address:
kubectl get ingress basic-ingress
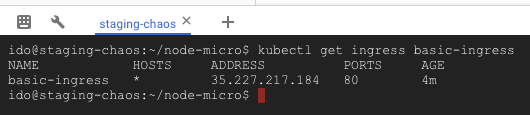
Open the given IP in your browser to see the demo app (if you see some weird errors, give it a few more minutes). It should look like this:
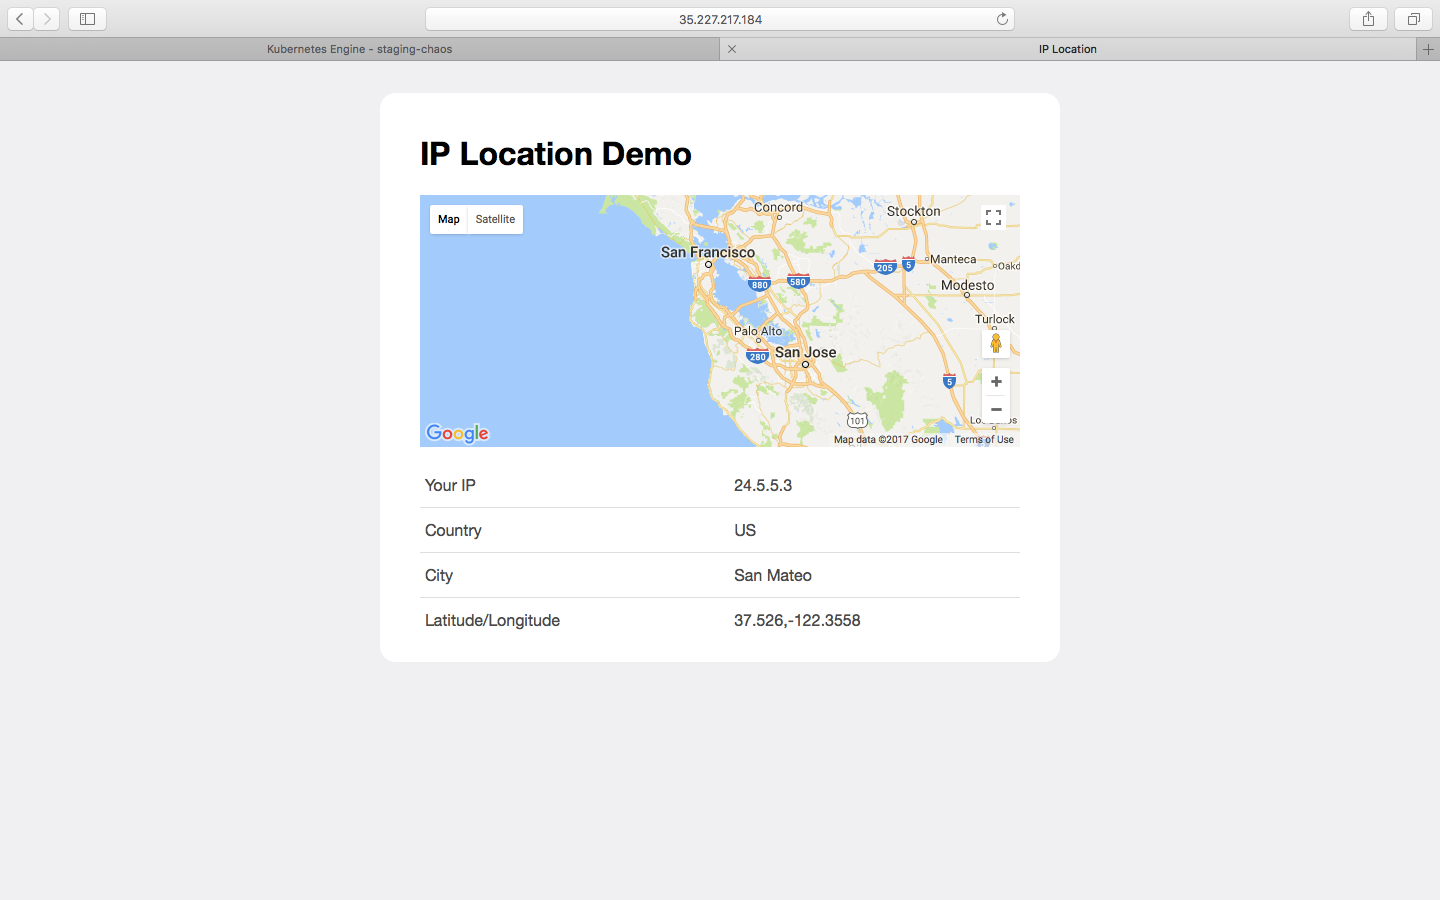
Cool! Our demo app is now running on a single pod in our Kubernetes cluster.
Simulating Steady State With Loadmill
Injecting failure into an empty system won’t teach us much. Because we are not running our chaos experiment in production, we’ll need to somehow simulate real users using our demo app while we run it.
According to the Principles of Chaos Engineering:
Systems behave differently depending on environment and traffic patterns. Since the behavior of utilization can change at any time, sampling real traffic is the only way to reliably capture the request path.
This is true for any application, and it’s especially true for our app since it identifies the user’s IP and looks for its real-world location. Blasting it with requests from a single IP won’t realistically simulate the behaviour we expect to see in production.
In order to simulate thousands of real user requests coming from multiple devices and different IP addresses, we’ll run a distributed performance test using Loadmill.
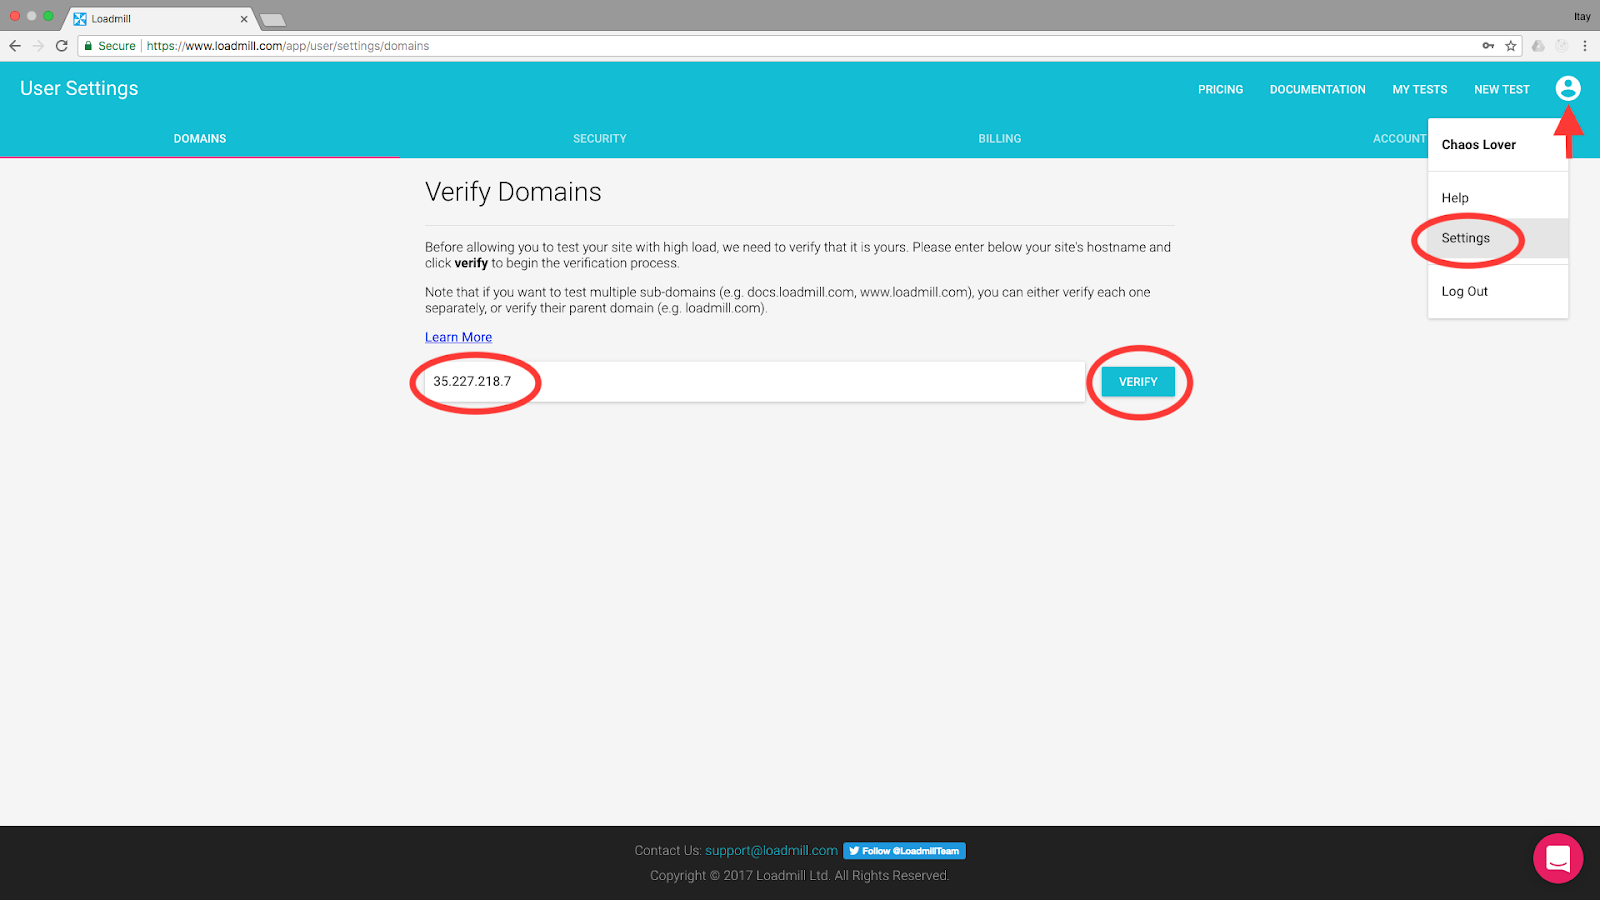
Start by signing up for a free account. For this demo, you’ll need to whitelist your external IP so you can load-test it.
Go toSettings >> Domains from the user icon at the top of the page. Copy the external IP to the text field and click Verify:
A dialog will open and explain some stuff. If you don’t care simply copy the verification token like so and leave it open:
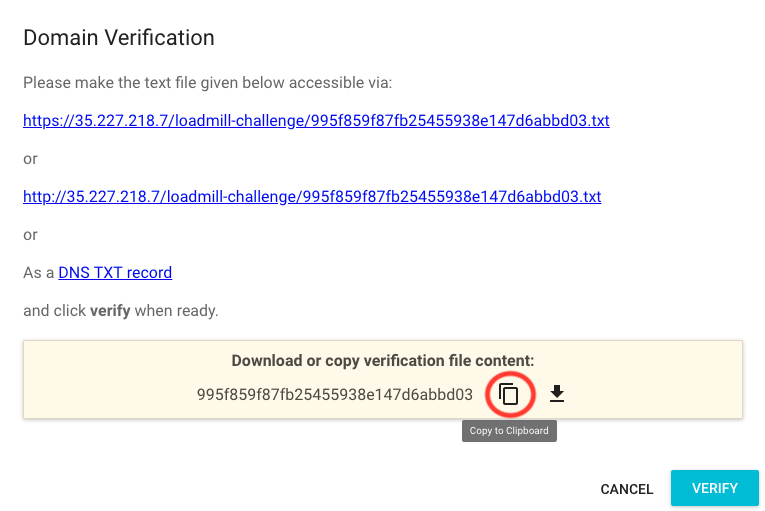
Go back to the console and run the following command (replace <YOUR_TOKEN> with the copied token) in the cloned directory:
sed -i ‘s/replace-me/<YOUR_TOKEN>/g’ deployment.yaml
Now the deployment config has your verification token as an environment variable. For it to take effect, we need to update our Kubernetes deployment:
kubectl apply -f deployment.yaml

Great! Go back to Loadmill and click Verify — you should see your IP added to the Verified Domains list. Now that Loadmill knows this is your app, you can load test it with up to 100 concurrent requests (on a free account).
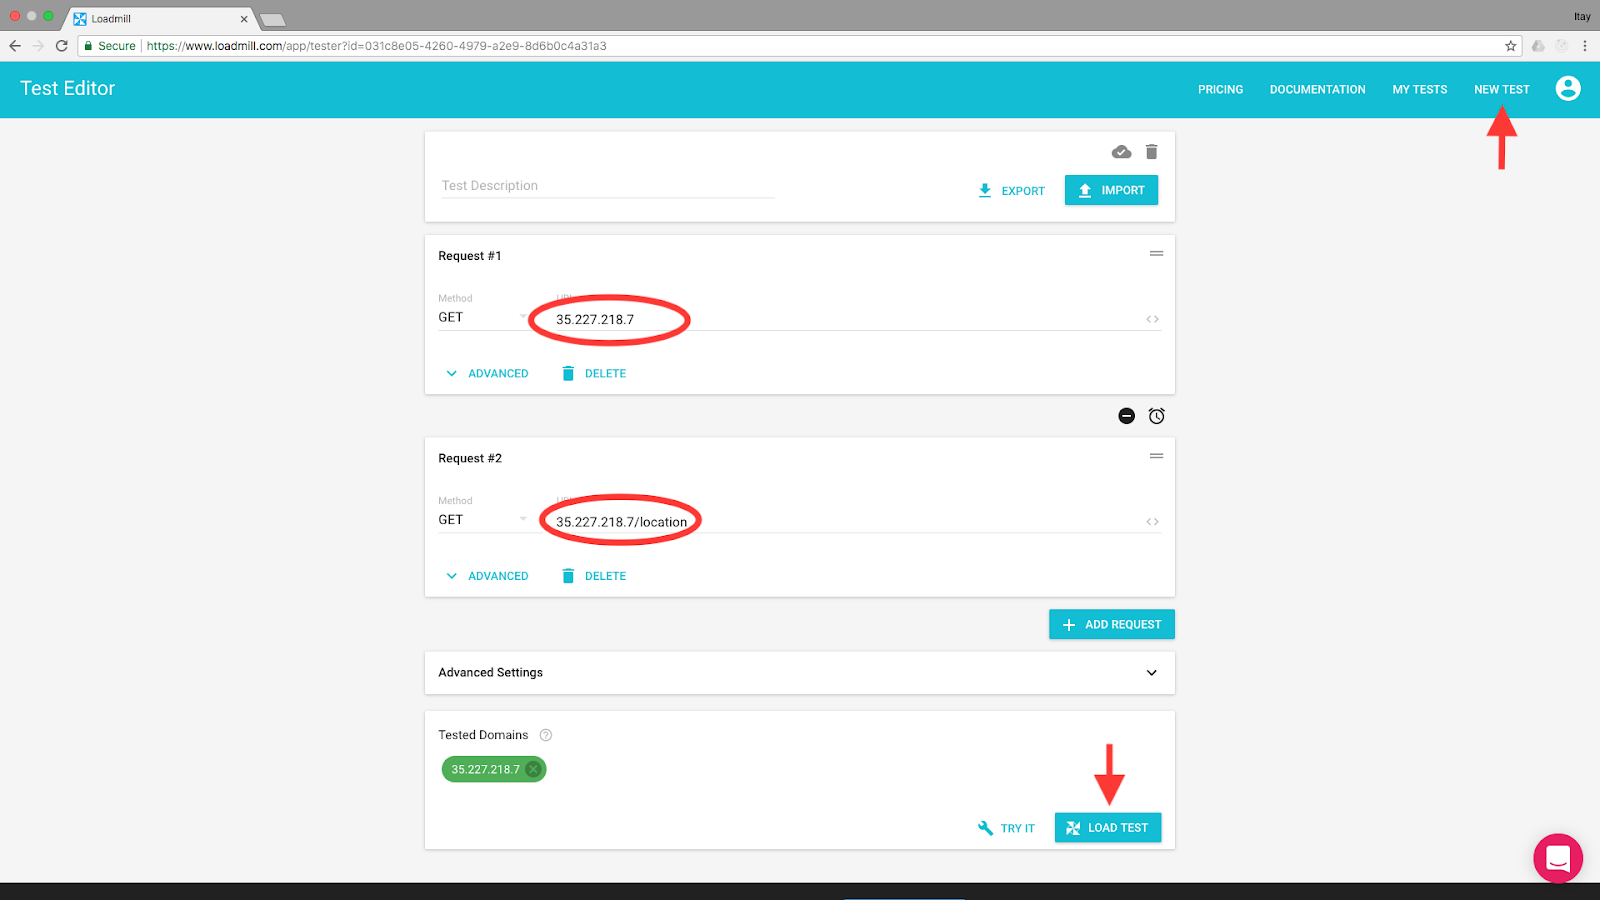
Click the NEW TEST link on the top navigation menu to open the test editor. We’ll add two simple HTTP requests by typing/pasting their URLs:
- http://<YOUR_EXTERNAL_IP> (e.g.http://35.227.218.7): get the app’s HTML page.
- http://<YOUR_EXTERNAL_IP>/location (e.g.http://35.227.218.7/location): get my location.
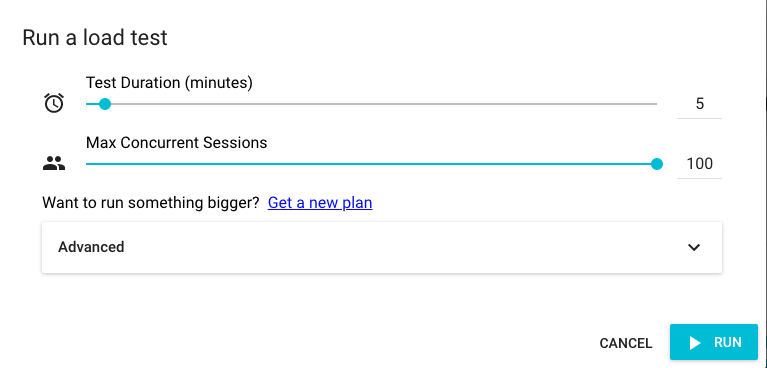
Click the Load Test button and select how many users you want to simulate and for how long:
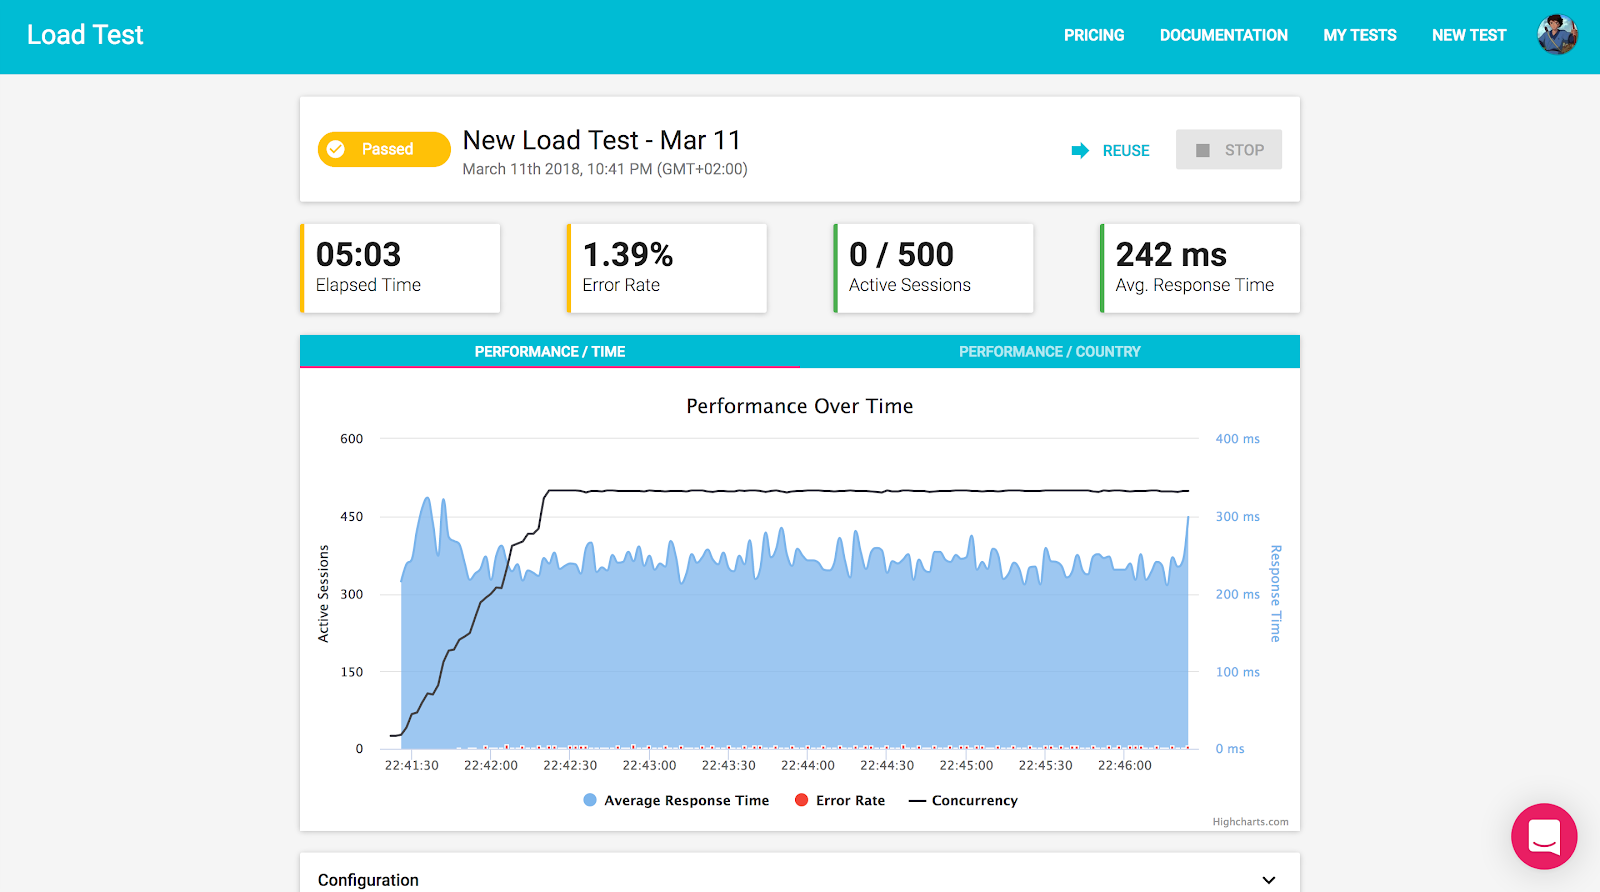
Now we can see what our Steady State looks like with “regular” user activity:
In GCP we can also monitor the cluster CPU utilization during the testhere:
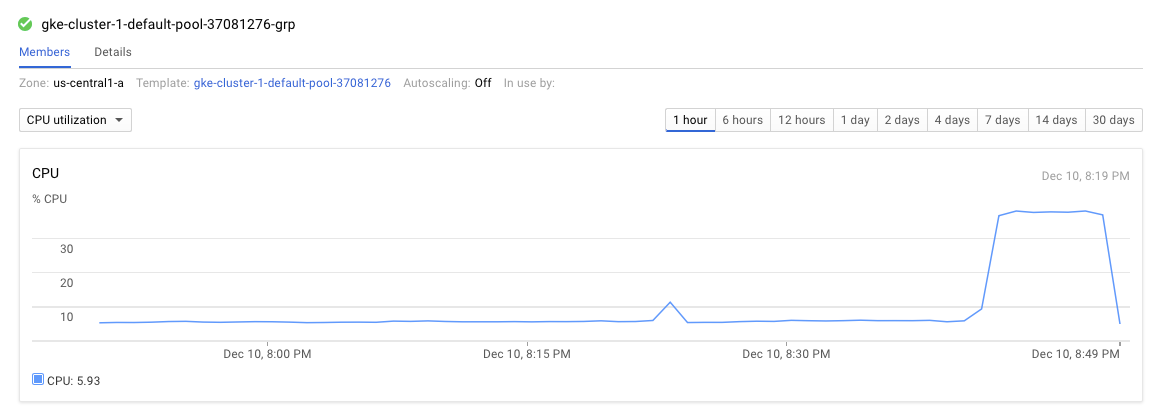
Nice. So this is what we expect to see when everything is fine. Now it’s time to see what happens with a little bit of chaos.
Creating a Hypothesis
Before we start breaking things, it’s best to create a hypothesis about what will happen to our system when it breaks. Since we are running our app using only one pod, we can assume that the result of this pod crashing will be quite severe. Our hypothesis is that our application will become (at least) temporarily unavailable.
Injecting Failure
It’s time to inject some failure into our system. For this test, I’ve selected Kubernetes Pod Chaos Monkey which is a very simple implementation of Netflix’s Chaos Monkey for kubernetes clusters. It randomly kills kubernetes pods in the cluster to encourage and validate the development of failure-resilient services.
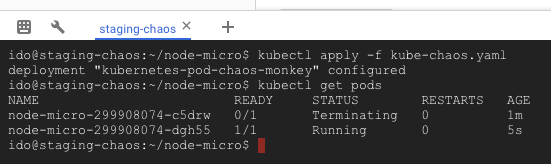
To run it, go back to the console and run the following command in the cloned directory (this will start killing pods immediately):
kubectl apply -f kube-chaos.yaml
You can runkubectl get podsevery few seconds to see the chaos in action. You will see pods being terminated and new ones created to replace them (mind the AGE column):
Now lets run our test again. Go back to the test tab, click reuse, and run it again.
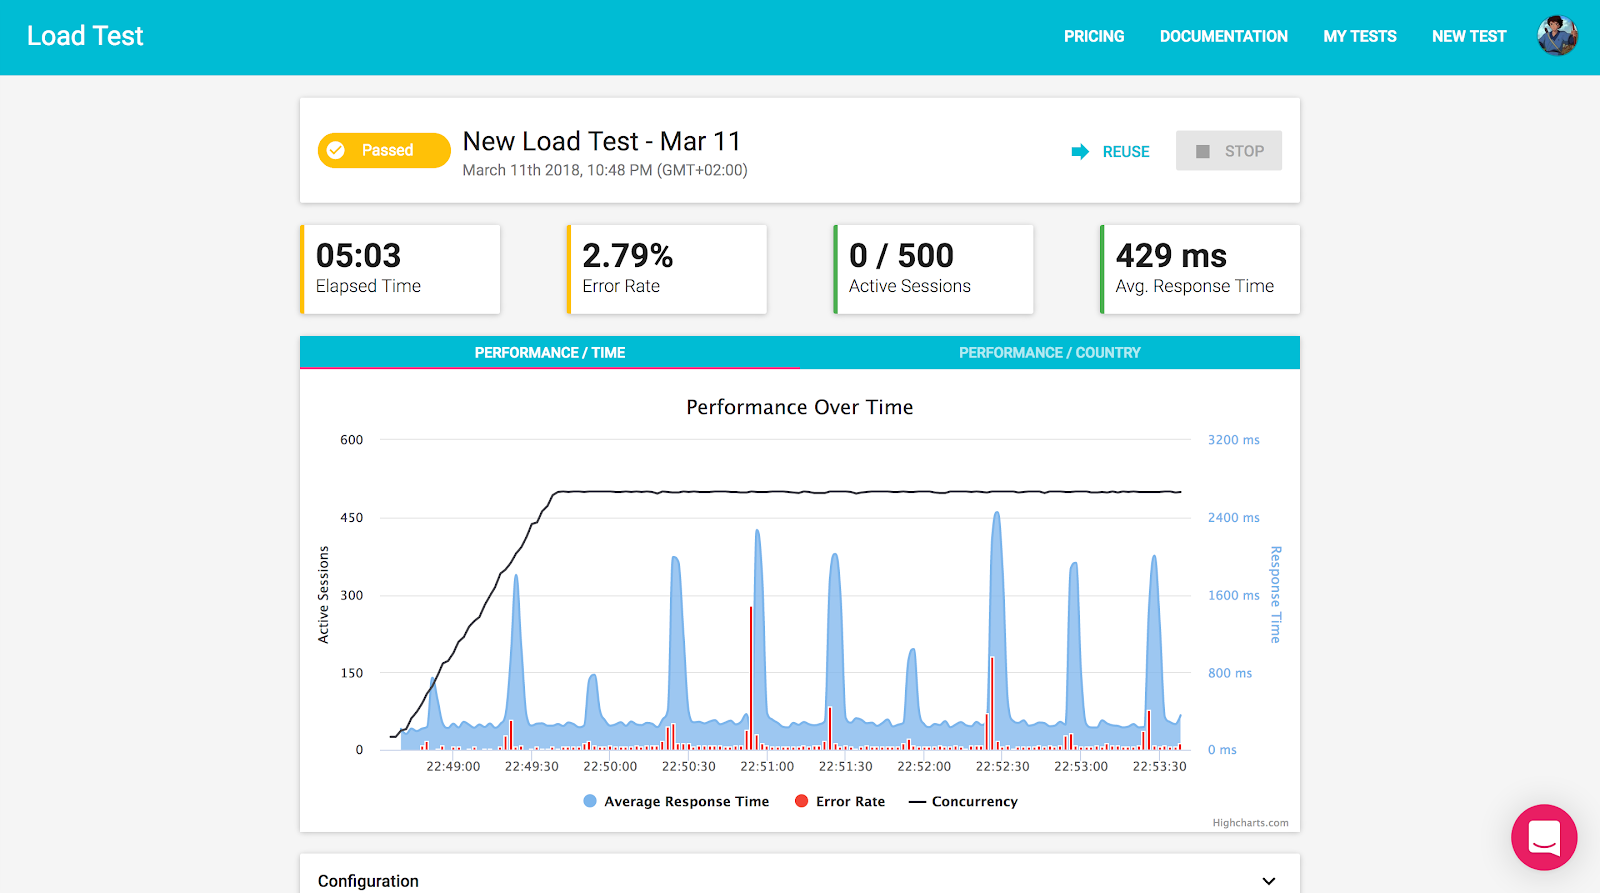
In the example above, we can clearly see the moments in which a pod was deleted, and a new one was created to replace it. This created a backlog of requests waiting for the new pod to start, and resulted in spikes of delayed responses, timeouts, and errors.
We have verified our experiment hypothesis. Crashing the only pod running our app does result in a very slow experience for our users. However, because of Kubernetes self-healing qualities, a new pod was immediately created to replace it, and the system has recovered remarkably fast. To better address this issue, we should always increase the number of replicas running our app, but I’ll leave it up to you to run this experiment 🙂
This guide is meant to be only the beginning. Now that you have some hands-on experience with chaos engineering combined with real-world testing, you can start creating more advanced experiments in your own staging environment and work your way up to bringing the chaos to production.